Using K3s to create a local Kubernetes environment
Today I will talk about K3s, a well-known technology that stands for Lightweight Kubernetes, a certified Kubernetes distribution (Cloud Native Computing Foundation) developed by Rancher for IoT and Edge computing.
The MiniKube was my first introduction to Kubernetes; after that, I began to use k3s since I liked the term "lightweight", and k3s truly is. There are more players in the game like k0s and kind in addiction MiniKube and k3s. Following k3s, you can experiment to see what works best for you.
After this introduction, it's time to see k3s up and running.
Installing
The instruction below will install k3s.
curl -sfL https://get.k3s.io | sh -
Then we must ensure that k3s is working, the official installation suggests waiting 30 seconds before testing.
sudo k3s kubectl get node
As you can see, starting k3s requires sudo by default. This drove me wild, until I found a solution to the permissions problem in a blog post.

Solving kubectl permission
To solve kubectl permissions, copy the file k3s.yaml to the user directory and modify the owner and permissions to make your local user accessible.
sudo sh -c "mkdir -p $HOME/.kube &&\
cp /etc/rancher/k3s/k3s.yaml $HOME/.kube/config &&\
chown -R $USER:$USER $HOME/.kube &&\
chmod 600 $HOME/.kube/config"
After fixing permissions, add the following line to your profile (.bashrc, .zshrc, .bash_profile, or .profile) to load the KUBECONFIG environment variable.
export KUBECONFIG=~/.kube/config
Now you may reload your terminal and try kubectl without sudo.
kubectl get pods
If everything goes well, you should receive the following message:
No resources found in default namespace.
However, if you had any issues The command below can assist you with identifying what occurred, further information is available in the official guide.
journalctl -u k3s
Running a pod
Let's set up a pod with NGINX and create the nginx.yaml file.
apiVersion: v1
kind: Pod
metadata:
  labels:
    app: nginx
  name: nginx
spec:
  containers:
  - args:
    - /opt/bitnami/scripts/nginx/run.sh
    env:
    - name: NGINX_ENABLE_ABSOLUTE_REDIRECT
      value: "yes"
    - name: NGINX_ENABLE_PORT_IN_REDIRECT
      value: "yes"
    - name: NGINX_HTTP_PORT_NUMBER
      value: "3000"
    image: docker.io/bitnami/nginx:latest
    name: nginx-nginx
    ports:
    - containerPort: 3000
      hostPort: 3000
    resources: {}
    securityContext:
      runAsNonRoot: true
  hostname: nginx
  restartPolicy: Never
status: {}
So, to create and run a pod, enter the command below.
kubectl apply -f pod.yaml
If you fall in love with terminal, you may use curl or your browser's quick test to test connectivity.
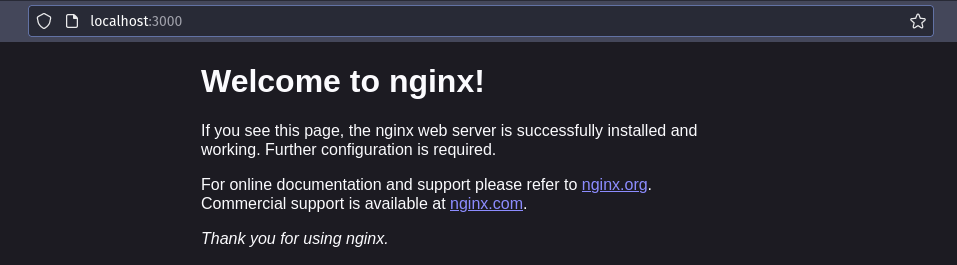
curl http://localhost:3000
Useful kubectl commands
List pods
kubectl get pods
Describe pod data
kubectl describe pod nginx
Get logs stdout and stderr
kubectl logs nginx
Accessing pod command-line
kubectl exec -it nginx -- bash
kubectl exec -it [pod] --container [container-name] -- bash
Deleting a pod
kubectl delete pod nginx
Delete deployment
kubectl delete -f pod.yaml
Final thought
Nice! I hope this post has helped you get started on your Kubernetes adventure; for future stages, you should look at other ways to run containers such as volume, network, secrets, scheduler, and other amazing features.
Thank you for taking the time to read this, and God bless your kernel 🧠.
Time for feedback!