Creating amazing games using Phaser and Vue (Nuxt/Vite)
In this article, I'll show you a library I built when I was fully immersed in front context, working with Angular, React, and Vue to see what worked best for me. Someone on GitHub asked me a few days ago to upgrade a library to the latest version Vue3, so I did, and then I thought...
Why haven't I written something about it?
I developed the nuxtjs-phaser package, which enables the use of Vue with Phaser, a JavaScript/Typescript framework for making games with Canvas. I desire to write a few posts about this framework because it is so powerful.
Many features are included in the Phaser, such as collision, physics kinds, work sprites, and so on. If you are unfamiliar with this framework, it is an excellent method to learn JavaScript/Typescript while having fun. In my perspective, coding for games rather than APIs and desktop programs helps us learn programming logic in a variety of scenarios.
My first programming experience was using RPG Maker, which any Nerd at the time knew or attempted to use to create our own RPG. I came across DirectX with Delphi after a long time of using RPG Maker with no game launched, and with that experience I learnt many PASCAL approaches, and I made an IDE to build my map titles. Because I didn't know XML or JSON at the time, I relied on text files with a specific structure. I created an RPG in which you can walk about and interact with objects, and the map was loaded by this title map generator; the code is a little messy, but I learned a lot.
Today, I admit that there is a lot more to learn than just programming languages, but if you have time, I recommend coding games; nowadays, you can publish games for free with advertisements, or develop something open-source, such as SuperTuxKart. Unity (C#), Love 2D (Lua), Godot (Python), Phaser (JavaScript/Typescript and Flame (Flutter) are some of the gaming frameworks available to us developers who want to have some fun.
Returning to Phaser's further stages I'll teach you how to use Vite to integrate Phaser into your Vue version 3. I made an example with Nuxt; the plugin is compatible with both Vue and Nuxt.
This article explains how to run Phaser; however, in order to construct games, we need articles that cover all Phaser functionalities. Take this as your first step.
Why Vue with Vite or Nuxt?
When I first saw Phaser, I thought...
How am I supposed to build these assets?
I tried Webpack, Parcel and most recently Nuxt. Webpack works well, but it's too much boilerplate. Parcel is easy to set up, but I wanted something that could be packaged as a WebApp, so my choice was Nuxt, but Next.js could work, but I fell in love Nuxt.
Promises, In the future, I'll be releasing this plugin for Vite to work with React.
Creating the Vue application
Remember to download assets or clone the repo and browse to understand plugin goals.
First, we'll construct an application with the create-vue tool. Make sure you have the most recent Node.js version installed before running the following command:
npm init vue@3

# or

npm create vue@3
Adding nuxtjs-phaser plugin
After you've created all of the vue boilerplate, use the following command to add the nuxtjs-phaser plugin.
npm install nuxtjs-phaser --save-dev

# or

yarn add --dev nuxtjs-phaser
Then, at your Vue App, install the vue plugin.
import { createApp } from 'vue'
import App from './App.vue'
import vuePhaserPlugin from 'nuxtjs-phaser/vue.index'

import './assets/main.css'

const app = createApp(App)

app.use(vuePhaserPlugin)

app.mount('#app')
Creating Phaser Game class
This time, we'll create a class with a whole small game, with the goal of not covering all Phaser capabilities and simply making Phaser and Vue work together.
We define Phaser context, attributes such as canvas size, styles, physics, and rendering.
- game.ts
import Phaser from 'phaser'

export const getGame = () =>
  new Phaser.Game({
    title: 'Phaser vue game example',
    type: Phaser.AUTO,
    width: 800,
    height: 500,
    backgroundColor: 'white',
    physics: {
      default: 'arcade',
      arcade: {
        gravity: { y: 500 }
      }
    },
    render: {
      pixelArt: true
    },
    autoFocus: true,
    scale: {
      parent: 'app'
    },
    scene: [new VueScene()]
  })
Game preload, load, update...
These Phaser events are responsible for loading (preload), rendering (create), and updating (update) canvas objects.
- game.ts
export class VueScene extends Phaser.Scene {
  constructor() {
    super({ key: 'default' })
  }

  preload() {}

  create() {}

  update() {}
}
Adding image and text
The image asset will be preloaded (cached) in the load event, and then we will define Phaser Image and Text to canvas context in the create event.
import meme from '@/assets/meme.png'

export class VueScene extends Phaser.Scene {
  private logo?: Phaser.GameObjects.Image
  private text?: Phaser.GameObjects.Text

  constructor() {
    super({ key: 'default' })
  }

  preload() {
    this.load.image('meme', meme)
  }

  create() {
    this.text = this.add.text(100, this.cameras.main.height / 2 - 100, 'More information can be found at willsena.dev.')

    this.logo = this.add.image(-100, this.cameras.main.height / 2 + 60, 'meme')
    this.logo.scale = 0.25
  }
}
Binding events between Vue and Phaser
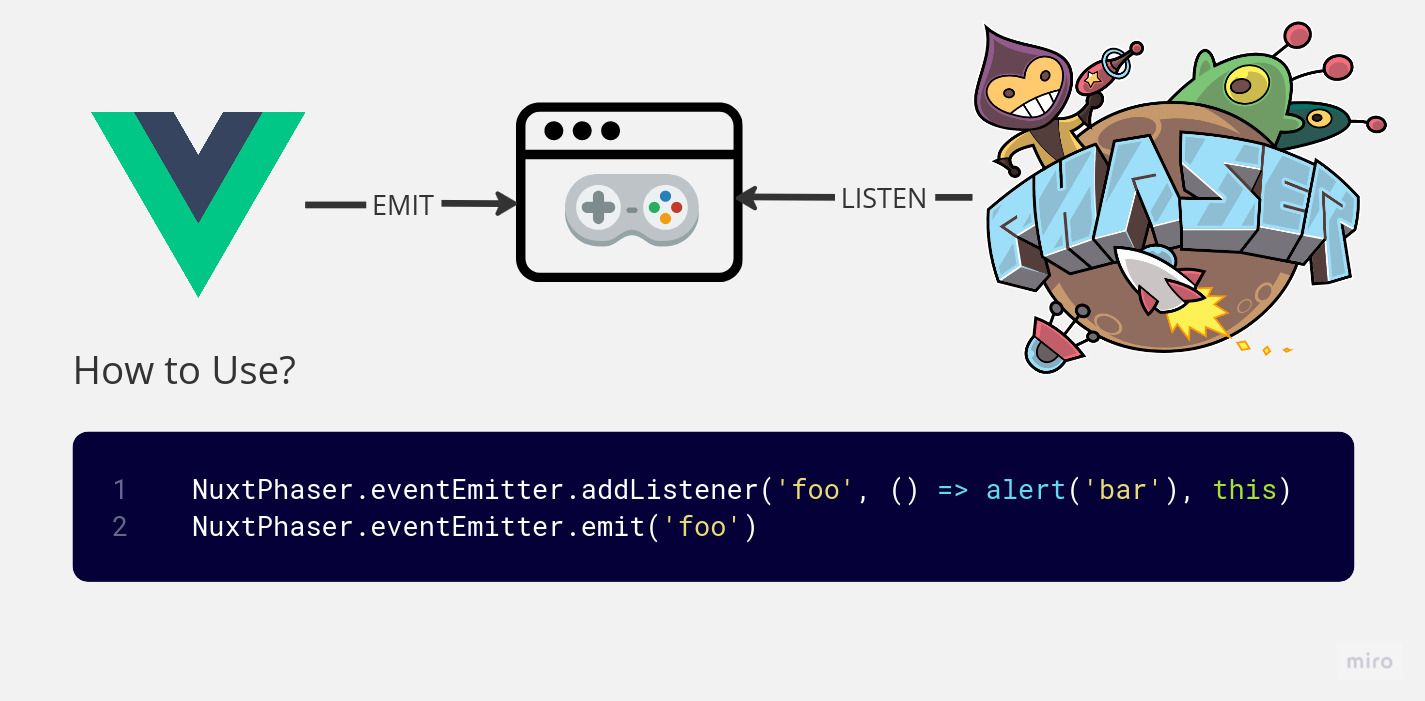
This is when the magic happens, thus Phaser Scene listens for Nuxt.js Phaser Plugin events through Vue Event Emitter, which may be emitted by Vue or any context.
export class VueScene extends Phaser.Scene {
  create() {
    NuxtPhaser.eventEmitter?.addListener('pause', this.pauseGame, this)
  }

  pauseGame() {
    if (this.game.isPaused) this.game.resume()
    else this.game.pause()
  }
}
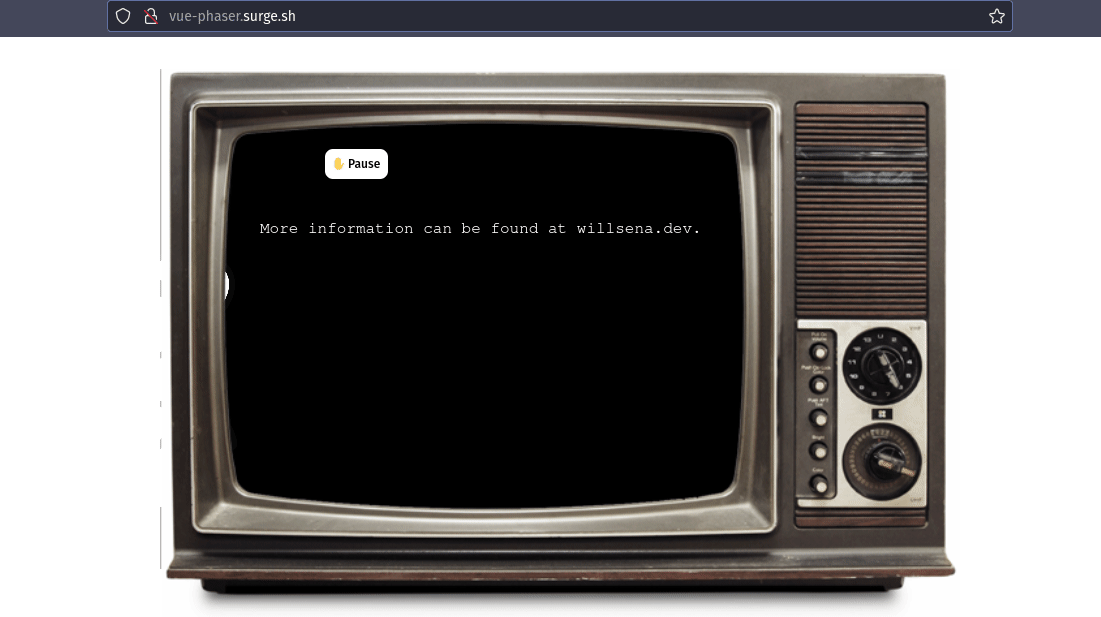
Vue component
Some HTML combined with JavaScript and CSS, so the Vue Component for close buddies. When the game variable is ready, the PhaserGame component is declared and defined.
The pause button is in charge of emitting an event that causes the game to pause.
- app.vue
<script setup lang="ts">
import PhaserGame from 'nuxtjs-phaser/phaserGame.vue'
import { getGame } from '@/game'
import televisionImage from '@/assets/television.png'

const game = () => getGame()
const emit = (eventName: string) => NuxtPhaser.eventEmitter?.emit(eventName)
const pause = () => emit('pause')
</script>

<template>
  <div class="game">
    <div class="buttons">
      <button type="button" @click="pause">✋ Pause</button>
    </div>
    <img :src="televisionImage" />
    <PhaserGame :createGame="game" v-if="game" />
  </div>
</template>

<style scoped>
.game img {
  position: absolute;
  width: 50rem;
}

.buttons {
  display: inline;
  position: absolute;
  left: 28rem;
  top: 7rem;
  z-index: 1;
}

button {
  background-color: #fff;
  border: none;
  color: black;
  padding: 0.5rem;
  text-align: center;
  text-decoration: none;
  display: inline-block;
  font-size: 12px;
  border-radius: 8px;
  font-weight: 500;
}

button:hover {
  background-color: tomato;
  font-weight: 500;
}
</style>
Running
You can view a live example here, thank you, Surge once more 🫶.
Because the plugin works with Nuxt, I created a somewhat more complex Nuxt example, complete with key bindings, which you can see here.

I can't leave anything out; all of these samples are available for download from my Github repository.
Last thoughts
So this time, we used Vue to create a small example of a Phaser game; this game might be deployed as static, therefore utilizing Nuxt or Vite as a builder is helpful.
You may cache your assets all across the world by utilizing one of my favorite free tools, Surge and Netlify with Cloudflare; follow this strategy to win.

Promises, I'll teach you how to package your games as an Android App (APK) in the next post too.
That's all for now; remember to keep your kernel 🧠 updated!
Bye! God bless you on this wonderful day 🔥!
Time for feedback!